
In modern music production, loudness is rarely created by a single plugin. The strongest masters usually result from several controlled stages working together, including arrangement, compression, saturation, clipping and final limiting.
Among these tools, the clipper and the limiter are frequently confused. Both can reduce peaks, increase perceived loudness and prevent the signal from exceeding a chosen ceiling. However, they do not process audio in the same way, and using the wrong tool can quickly remove punch, introduce distortion or flatten an otherwise powerful mix.
Understanding the difference between a clipper vs limiter is essential for producers working in electronic music, hip-hop, trap, rock, pop, house, techno and any genre where loudness must coexist with transient impact.
This guide explains how clippers and limiters work, when to use each processor and why placing a clipper before a limiter can often create a louder, cleaner and more dynamic master.
What Is a Clipper?
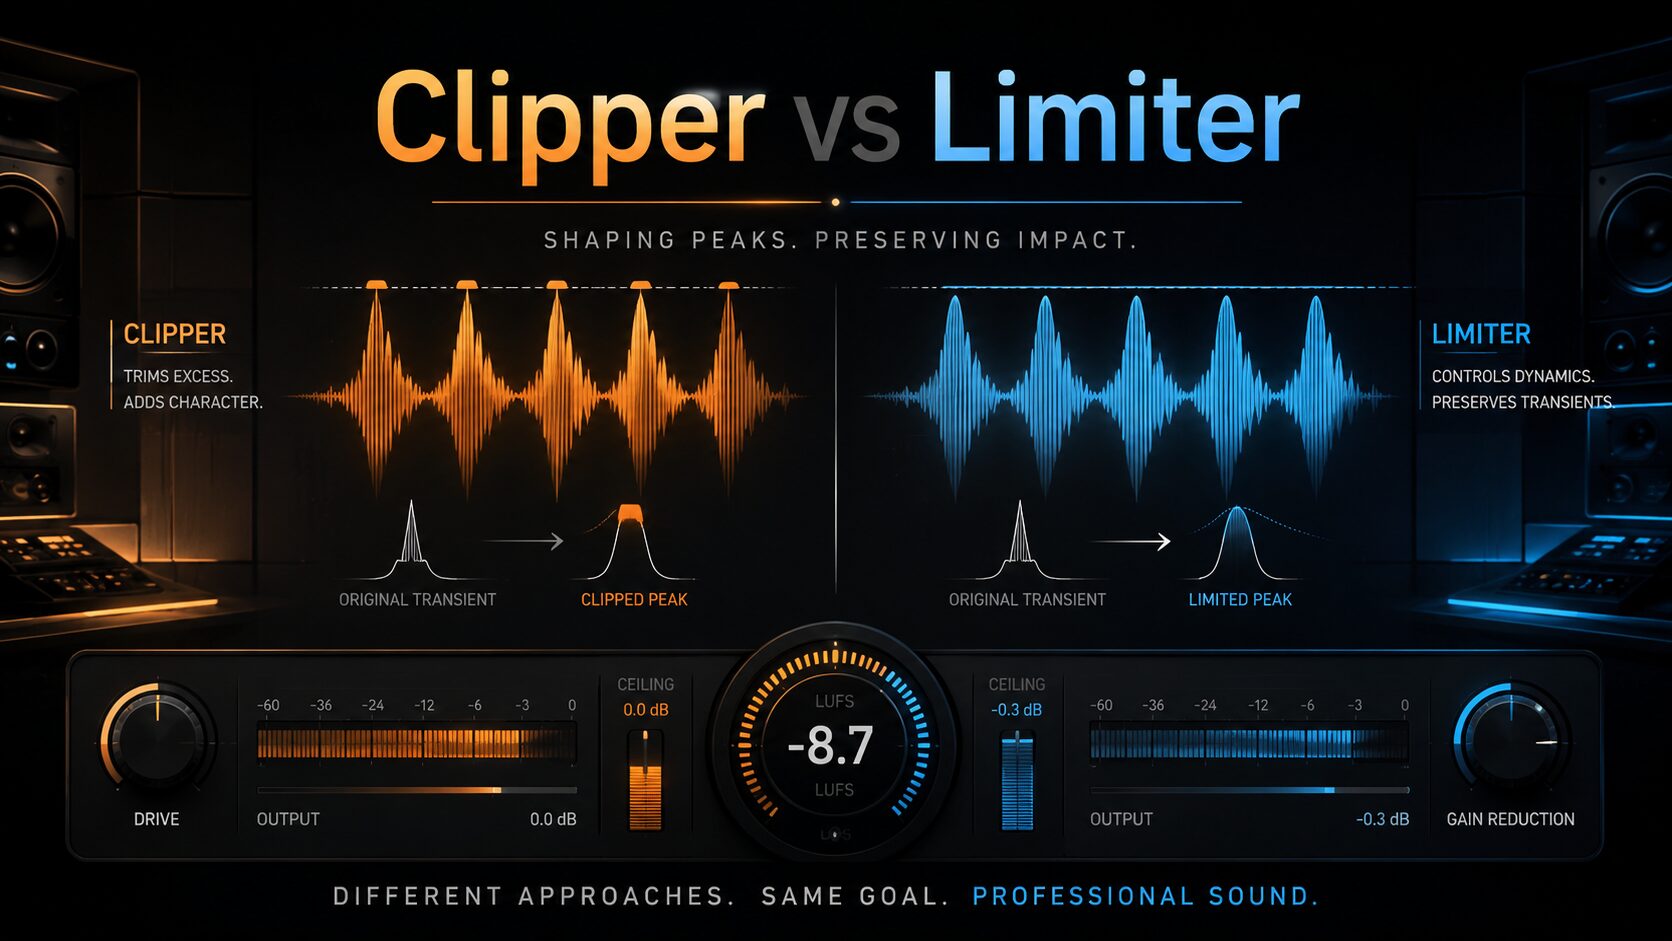
A clipper controls peaks by cutting or reshaping the part of the waveform that exceeds a defined threshold. Instead of gradually turning the entire signal down, it directly modifies the highest transient peaks.
When a kick, snare or percussion hit briefly rises above the clipping threshold, the clipper removes or rounds the top of that transient. This reduces the peak level while allowing the body of the sound to remain relatively unchanged.
The result is a smaller peak-to-average ratio, which means the signal can be made louder without requiring as much gain reduction from the final limiter.
Clipping is not automatically a defect. Uncontrolled digital clipping at the output of a converter or export chain can sound harsh, but intentional clipping inside a dedicated plugin can be precise, oversampled and musically useful.
Hard Clipping
Hard clipping creates a strict boundary. Any part of the waveform exceeding the threshold is cut off abruptly.
This approach is effective for removing extremely short peaks, but it also creates additional harmonics. On drums and aggressive electronic music, those harmonics can add density and attitude. On vocals, acoustic instruments or delicate mixes, excessive hard clipping may sound brittle or obviously distorted.
Soft Clipping
Soft clipping rounds the waveform more gradually as it approaches the ceiling. It usually sounds smoother and can add subtle harmonic saturation before obvious distortion appears.
A soft clipper can therefore serve two purposes:
- Control transient peaks.
- Add harmonic density and perceived loudness.
Soft clipping is often useful on drum buses, basses, synth buses and full mixes that need additional weight without aggressive brickwall limiting.
What Is a Limiter?
A limiter is an extreme form of dynamic range control. When the signal approaches or exceeds the threshold, the limiter reduces its gain according to its internal detection, lookahead and release system.
Unlike a clipper, which directly reshapes the waveform, a limiter attempts to control peaks by moving the signal level downward. Modern limiters can analyze incoming transients before they reach the output, allowing them to react quickly while reducing audible distortion.
The output ceiling determines the maximum level the limiter should allow. A true peak limiter can also estimate inter-sample peaks that may appear during digital-to-analog conversion or lossy encoding.
Limiters are commonly used as the final processor in a mastering chain because they provide:
- Final peak protection.
- True peak control.
- Increased average loudness.
- More consistent output levels.
- Protection against unexpected overs.
However, a limiter is not a repair tool for an uncontrolled mix. When it is forced to remove too much level, it can reduce drum impact, produce pumping, distort the low end and make the entire track feel smaller.
Clipper vs Limiter: The Main Difference
The fundamental difference is the way each processor handles peaks.
| Feature | Clipper | Limiter |
|---|---|---|
| Primary action | Reshapes or cuts waveform peaks | Reduces signal gain |
| Processing behavior | Usually immediate | Uses detection, lookahead and release |
| Distortion | Intentionally creates harmonics | Designed to minimize distortion |
| Best use | Short transient control | Final loudness and peak safety |
| Common placement | Before the final limiter | At the end of the mastering chain |
| Possible problem | Harshness or flattened transients | Pumping, dullness or loss of punch |
A clipper is generally more efficient at removing very short and aggressive transients. A limiter is more suitable for controlling the remaining peaks and establishing the final output ceiling.
This is why many modern mastering chains use both processors rather than asking one limiter to perform every loudness-related task.
Why Use a Clipper Before a Limiter?
A limiter often reacts heavily to isolated peaks that are much louder than the rest of the mix. A single snare transient may trigger several decibels of gain reduction, causing the entire mix to move downward for a brief moment.
Placing a clipper before the limiter can remove the narrowest and least musically important part of that peak. The limiter then receives a more controlled signal and does not need to work as hard.
This can produce several benefits:
- More perceived loudness.
- Less limiter gain reduction.
- Stronger drum impact.
- Reduced pumping.
- A more stable low end.
- Cleaner final peak control.
The objective is not to destroy every transient. The goal is to divide the work intelligently between two processors.
Instead of forcing a limiter to remove 5 dB on every snare hit, a clipper might remove the first 1 or 2 dB, leaving the limiter to handle the remaining level more smoothly.
A Practical Clipper and Limiter Mastering Chain
The following workflow provides a useful starting point. The exact settings will depend on the genre, arrangement and condition of the mix.
1. Start With a Controlled Mix
Before adding a clipper or limiter, make sure the kick, bass, snare and vocal are properly balanced. Loudness processors exaggerate existing problems. An uncontrolled low end will not become more professional simply because it passes through an expensive limiter.
Check for excessive resonances, unnecessary sub frequencies and individual elements that create unpredictable peaks.
2. Insert the Clipper Before the Limiter
Place the clipper near the end of the mastering chain, usually after tonal EQ, compression and other broad processing. The limiter should normally remain after the clipper.
A typical chain could look like this:
Corrective EQ > Compression > Saturation > Stereo Processing > Clipper > True Peak Limiter > Metering
This order is not an absolute rule. Some mastering engineers use several clipping and limiting stages. However, clipper before limiter is a reliable starting point for modern electronic, hip-hop and pop production.
3. Raise the Clipper Input Gradually
Increase the input level until the loudest transients begin to touch the clipping threshold. Listen carefully to the kick, snare, hi-hats and vocal consonants.
Start by clipping approximately 1 dB on the loudest peaks. In aggressive genres, more clipping may work, but the amount should always be judged by ear rather than by chasing a fixed number.
If the track becomes smaller, harsher or less rhythmic, reduce the clipping amount.
4. Use Oversampling
Clipping creates harmonics, and some of those harmonics may exceed the available digital frequency range. They can fold back into the audible spectrum as aliasing.
Oversampling allows the plugin to process the signal internally at a higher sample rate, reducing audible aliasing and often producing smoother high frequencies.
For mastering, 4x or 8x oversampling is often a practical starting point. Higher values may improve quality in some situations, but they also increase CPU usage and processing latency.
Always compare the result with level matching. A technically more advanced mode is not automatically better for every track.
5. Feed the Controlled Signal Into the Limiter
After clipping the sharpest peaks, raise the limiter input or lower its threshold until the desired loudness is reached.
Watch the gain reduction, but do not mix with your eyes. Listen for:
- Loss of kick impact.
- Snare transients becoming dull.
- Bass distortion.
- Vocals moving backward.
- Pumping between kick and bass.
- Reduced stereo depth.
If the limiter is constantly removing large amounts of gain, return to the mix or reduce the loudness target. A mastering limiter should finish the work, not conduct an emergency rescue operation.
6. Set the Final Output Ceiling
The appropriate ceiling depends on the delivery format and the behavior of the limiter.
For compressed streaming formats, many producers use a true peak ceiling around -1 dBTP as a cautious starting point. This provides some headroom for inter-sample peaks that may appear during encoding.
This is not a universal mastering law. Club masters, CD masters, vinyl pre-masters, broadcast files and streaming releases may require different deliverables.
7. Compare at Equal Loudness
A louder signal almost always appears more exciting during a quick comparison. This can make destructive clipping or limiting sound impressive even when it has reduced depth, punch and clarity.
Use output gain or an automatic gain-matching function to compare the processed and unprocessed signals at approximately the same perceived loudness.
The processed version should sound more controlled and competitive, not merely louder.
When Should You Use Only a Clipper?
A clipper can be used without a final limiter on individual tracks and buses where the goal is transient shaping rather than final output protection.
Common examples include:
- Controlling snare peaks.
- Adding density to a drum bus.
- Tightening an aggressive kick.
- Managing percussion transients.
- Adding harmonics to bass sounds.
- Preventing synth layers from creating extreme peaks.
On individual channels, the clipper does not need to set the final master ceiling. It can simply reduce peaks and create a more stable signal for later processing.
When Should You Use Only a Limiter?
A limiter may be sufficient when the mix is already controlled and only needs final peak protection or a moderate increase in loudness.
For acoustic music, jazz, classical recordings, ambient productions or dynamic singer-songwriter material, audible clipping may not support the artistic direction.
A transparent limiter performing one or two decibels of gain reduction may preserve the natural character of the recording better than an aggressive clipper and limiter combination.
Best Clipper VST Plugins
Kazrog KClip 3
KClip 3 is a professional clipping plugin designed for mixing and mastering. It includes multiple clipping modes, multiband operation, Mid/Side processing and high-quality oversampling.
Its flexibility makes it suitable for individual drums, buses and full masters. The different clipping modes allow producers to move between transparent peak shaving and more obvious harmonic coloration.
Kazrog KClip Zero – Free
KClip Zero is a free and simplified clipper from Kazrog. It provides straightforward peak control and mastering-grade oversampling without the advanced multiband and Mid/Side features of KClip 3.
It is an excellent starting point for producers learning how clipping affects drums and full mixes.
Newfangled Audio Saturate
Newfangled Audio Saturate is a spectral clipper designed to control peaks while preserving fine detail. Its controls allow users to adjust the clipping shape, symmetry, ceiling and harmonic behavior.
Saturate is particularly useful when conventional clipping sounds too destructive or when a master needs additional density without immediately losing its internal detail.
Venn Audio Free Clip 2 – Free
Free Clip 2 is included in the free Venn Audio Free Suite. It offers an accessible way to experiment with clipping inside modern DAWs without purchasing a premium mastering plugin.
For producers building a free mixing and mastering toolkit, it provides a practical introduction to controlled peak shaving.
Shatter Clip by Golden DSP – Free
Shatter Clip is a free clipper featured on Audiartist. It includes several clipping modes, oversampling, Auto-Gain, parallel processing and visual feedback for producers who want to understand exactly how much of the signal is being clipped.
Best Limiter VST Plugins
FabFilter Pro-L 2
FabFilter Pro-L 2 is one of the most widely used professional limiters for mixing and mastering. It combines several limiting algorithms with true peak limiting, loudness metering, oversampling and detailed gain-reduction visualization.
Its different styles make it suitable for transparent mastering, aggressive electronic music and fast peak control. Pro-L 2 is particularly useful after a clipper because its visual display makes it easy to see whether the initial clipping stage has reduced limiter workload.
iZotope Ozone 12 Maximizer
iZotope Ozone 12 Advanced includes the Maximizer module as part of its complete mastering environment. The Maximizer provides several IRC limiting modes and tools for balancing loudness, transient preservation and final output control.
It is well suited to producers who prefer an integrated mastering workflow with EQ, dynamics, imaging, clipping, limiting and metering available inside one suite.
TDR Limiter 6 GE
TDR Limiter 6 GE combines several specialized dynamics stages in one modular plugin. Its processing modules include compression, high-frequency limiting, clipping, peak limiting, output protection and loudness metering.
Because the modules can be arranged into a complete loudness chain, Limiter 6 GE is an excellent tool for learning how clipping and limiting interact.
sonible smart:limit
sonible smart:limit combines automatic signal analysis with manual limiting controls, loudness monitoring and dynamics information.
It can suggest initial settings based on the source material while still allowing the producer to control the final sound. This makes it useful for independent producers who want fast results without losing access to detailed loudness and dynamics information.
Common Clipping and Limiting Mistakes
Clipping the Entire Mix Too Aggressively
A clipper may appear transparent during a short loud section, but distortion can accumulate across an entire track. Always listen to verses, choruses, breakdowns and the final section before approving the settings.
Using the Limiter to Fix the Kick and Bass
If every kick hit causes several decibels of gain reduction, the problem may be the relationship between the kick and bass rather than the limiter itself.
Check their frequency balance, phase, envelopes and arrangement before applying more mastering processing.
Ignoring Oversampling
Clipping without appropriate oversampling can generate audible aliasing, particularly on bright synths, cymbals and full mixes. Test the plugin at different oversampling values before rendering the final file.
Chasing LUFS Instead of Sound
LUFS is a useful measurement, not a creative objective. Two tracks with the same integrated LUFS value can have completely different punch, density and perceived impact.
For a deeper understanding of loudness normalization, read the Audiartist guide to LUFS and loudness for streaming.
Failing to Level-Match
Without gain matching, it is easy to choose the louder version even when it has more distortion and less depth. Compare at equal loudness before deciding whether the clipper or limiter has genuinely improved the master.
Applying the Same Chain to Every Track
A chain that works for techno may destroy an acoustic song. A dense hip-hop master may tolerate more clipping than an orchestral piece. Processing decisions should follow the music rather than a saved preset.
Clipper vs Limiter for Different Genres
EDM, House and Techno
Clipping is commonly used to control kicks, drum buses and aggressive synth peaks. A clipper followed by a transparent limiter can achieve competitive loudness while preserving the rhythm of the drop.
Hip-Hop and Trap
Clippers can control hard snare transients and add density to drums. Careful low-end monitoring is essential because excessive clipping may distort long 808 bass notes.
Rock and Metal
Clipping can reduce unpredictable drum peaks and increase density, but distorted guitars already contain large amounts of harmonic information. Too much additional clipping may make the upper midrange harsh and tiring.
Pop
A moderate clipper and limiter combination can create a polished, loud master while retaining vocal clarity. Listen carefully to consonants, cymbals and bright synth layers.
Acoustic, Jazz and Classical Music
Transparent limiting is often more appropriate than obvious clipping. Preserving natural transient movement and dynamic contrast may be more important than achieving maximum loudness.
Frequently Asked Questions
Is a clipper better than a limiter?
Neither processor is universally better. A clipper is efficient at controlling short transient peaks, while a limiter is better suited to final loudness management and output protection. Many modern mastering chains use both.
Should a clipper always go before a limiter?
A clipper is commonly placed before the final limiter because it can reduce sharp peaks and make the limiter work less aggressively. However, creative chains may use different orders or multiple stages.
How much clipping is safe on a master?
There is no universal safe amount. Start with approximately 1 dB on the loudest peaks and listen carefully. Some aggressive productions may tolerate more, while dynamic recordings may require almost none.
Does clipping make music louder?
Clipping reduces the distance between transient peaks and the average signal level. This allows the overall level to be increased and can add harmonics that contribute to perceived loudness.
Can a limiter replace a clipper?
A limiter can control peaks without a clipper, especially when the mix is already balanced. However, forcing one limiter to remove every aggressive transient may create pumping, distortion or reduced punch.
Can a clipper replace a limiter?
A clipper can control peaks, but it may not provide the true peak protection, release behavior and final output security of a dedicated mastering limiter. For streaming masters, a true peak limiter is often useful as the final stage.
Final Verdict: Clipper or Limiter?
The real question is not whether you should choose a clipper or a limiter. It is which processor should handle each part of the loudness process.
Use a clipper to control short, aggressive peaks and reduce the amount of work required from later dynamics processing. Use a limiter to establish final loudness, manage the remaining peaks and protect the output ceiling.
When both processors are used carefully, the result can be louder, cleaner and more energetic than a master created by pushing one limiter until the waveform looks like a brick with career ambitions.
The most important rule remains simple: preserve the musical impact of the track. Loudness is useful only when the master still sounds powerful after the volume has been matched.
For additional mastering tools, explore the Audiartist selection of the best mastering plugins for independent producers in 2026.